
Easy Chicken Manicotti Recipe – Delicious Stuffed Pasta Bake

Growing up in a bustling Italian-American kitchen, I learned that some recipes are more than just food. They’re memories wrapped in warm, comforting layers. Our chicken manicotti recipe captures that essence perfectly, turning simple ingredients into a stunning stuffed manicotti shells experience that brings families together.
This baked pasta dish is more than just another weeknight meal. It’s a celebration of flavors, textures, and traditions passed down through generations. The creamy chicken filling inside tender pasta tubes creates a symphony of taste that will make everyone at your dinner table smile.
Whether you’re cooking for a busy family or preparing a special dinner, this chicken manicotti recipe promises to deliver restaurant-quality comfort right in your own kitchen. With just the right balance of herbs, cheese, and succulent chicken, it’s a meal that transforms ordinary evenings into memorable occasions.
Table of Contents
Key Takeaways
- Quick and easy chicken manicotti recipe perfect for family dinners
- Versatile dish that can be prepared in advance
- Rich, creamy filling that appeals to all ages
- Customizable with various herbs and cheese options
- Classic Italian-American comfort food
Introduction to Italian-Inspired Comfort Food
Italian cuisine has been a big part of American family meals for a long time. It brings warmth and connection to dinner tables everywhere. Manicotti is a key comfort food that mixes traditional Italian cooking with what Americans love.
The story of manicotti in America is a tasty tale of food adaptation. These big, tube-shaped pasta shells came with Italian immigrants. They quickly became a favorite dish, moving from a regional specialty to a national hit.
Roots of Manicotti in American Kitchens
Italian immigrants brought more than just recipes to the United States. They also brought authentic cooking techniques that changed American family meals. Manicotti is a great example of this:
- It started in Southern Italian cooking traditions
- It was adapted to local ingredients and tastes
- It became a staple on Italian-American restaurant menus
Why Chicken Manicotti Works for Family Dinners
This chicken manicotti recipe is the perfect family meal. It mixes the richness of Italian food with what modern families need. The dish offers:
- It’s easy to make for busy parents
- It has flavors that everyone loves
- It’s made with nutritious ingredients for a healthy meal
Families will love how this comfort food brings them together. It creates memories around a single, hearty dish that honors tradition and modern cooking.
Essential Ingredients for Chicken Manicotti
Making a tasty poultry main course needs the right ingredients. Chicken Manicotti is a classic dish that mixes rich flavors and textures. It uses ingredients that work well together.
Pasta and Protein Selection
Start with top-notch ingredients for a great meal. Choose authentic manicotti shells for your filling. For chicken, go for boneless, skinless breasts that are easy to shred or dice.
- Manicotti pasta shells
- Boneless, skinless chicken breasts
- Fresh or dried herbs for seasoning
Cheese and Sauce Essentials
The creamy sauce and cheese mix is key to Chicken Manicotti. Ricotta, mozzarella, and parmesan make a filling that’s both rich and smooth. This filling makes the dish special.
| Cheese Type | Purpose in Recipe | Quantity Recommended |
|---|---|---|
| Ricotta Cheese | Primary filling base | 15 oz |
| Mozzarella | Melting and stretching | 2 cups, shredded |
| Parmesan | Flavor enhancement | 1/2 cup, grated |
Seasonings and Customization
Make Chicken Manicotti your own with extra seasonings and ingredients. Add fresh herbs like basil and parsley for a bright taste. Spinach or mushrooms can also add interesting textures.
- Italian seasoning blend
- Garlic powder
- Red pepper flakes (optional)
- Fresh herbs for garnish
Recipe Preparation Time and Servings
Making this tasty chicken manicotti dinner is simpler than you think. It’s perfect for busy families who want a memorable meal without spending hours cooking. Here’s a quick look at the time needed and how many it serves.
Planning is crucial for this tasty pasta dish. It requires careful timing and managing ingredients. Home cooks will find it easy to make this impressive dinner.
| Cooking Stage | Time Required |
|---|---|
| Preparation Time | 15 minutes |
| Cooking Time | 1 hour 5 minutes |
| Total Time | 1 hour 20 minutes |
| Servings | 7 people |
Knowing how long it takes helps families plan their meals. This recipe is great for:
- Weekend family gatherings
- Potluck dinners
- Make-ahead meal preparation
- Entertaining guests
The chicken manicotti feeds about seven people, perfect for medium-sized family meals. You can easily adjust the recipe for different group sizes.
“Great meals don’t have to consume your entire day. Smart preparation makes delicious dining possible!” – Home Cooking Enthusiast
Kitchen Equipment and Tools Needed

Creating a tasty baked pasta dish like chicken manicotti needs the right kitchen tools. The right equipment makes cooking Italian cuisine a breeze. Let’s look at the key items you’ll need for this delicious meal.
Essential Bakeware and Cooking Tools
- 9×13-inch Baking Dish: The main dish for your chicken manicotti, ensuring even cooking and perfect presentation
- Large Skillet: For preparing the chicken and sauce
- Large Mixing Bowl: Perfect for combining ingredients and creating the filling
- Pastry Bag or Zip-Top Plastic Bag: For easy and precise manicotti shell filling
When picking your kitchen tools, look for durability and functionality. A sturdy ceramic or glass baking dish is best for this classic Italian recipe. Choose non-stick surfaces to make cleanup a breeze after your delicious baked pasta dish.
Additional Recommended Tools
- Sharp Chef’s Knife: For precise ingredient preparation
- Cutting Board
- Measuring Cups and Spoons
- Cheese Grater
Pro tip: If you don’t have a pastry bag, cut a small corner off a zip-top bag. This hack lets you make restaurant-quality manicotti at home without spending a lot.
Step-by-Step Filling Preparation
Creating the perfect filling is key for a great poultry main course. The right mix of ingredients turns simple stuffed manicotti shells into a meal to remember. It will impress your family and guests.
Before starting, make sure you have all your ingredients ready. The secret to a tasty ricotta cheese filling is finding the right balance of flavors and textures.
Creating the Perfect Chicken Mixture
Begin by picking top-quality chicken for your filling. Shred or chop cooked chicken finely to make it tender. Season it well to bring out its natural taste.
- Choose boneless, skinless chicken breasts
- Cook chicken thoroughly before shredding
- Season with Italian herbs and garlic
- Allow chicken to cool slightly before mixing
Crafting the Cheese Blend
The ricotta cheese filling is the heart of your manicotti recipe. Mix ingredients gently to keep it creamy and smooth.
- Mix ricotta cheese with shredded mozzarella
- Add grated Parmesan for depth of flavor
- Incorporate a beaten egg to bind ingredients
- Fold in finely chopped spinach for extra nutrition
Mastering the Filling Technique
Filling stuffed manicotti shells needs patience and precision. Use a piping bag or a small spoon to fill each shell carefully. This ensures the chicken and cheese mix is evenly spread.
Pro tip: Slightly undercook the manicotti shells to prevent them from becoming too soft during the final baking process.
Sauce Making Instructions
Making the perfect creamy sauce is key to making your Chicken Manicotti taste like real Italian food. The sauce is the base flavor that ties everything together. It turns simple ingredients into a dish you’ll always remember.
- Homemade marinara sauce from scratch
- High-quality store-bought marinara sauce
- Creamy sauce variations for different tastes
Here are some important tips for making your sauce:
- Choose a rich, flavorful tomato base
- Boost store-bought sauces with fresh herbs
- Make sure to spread the sauce evenly in the baking dish
| Sauce Type | Preparation Time | Flavor Intensity |
|---|---|---|
| Homemade Marinara | 30-45 minutes | High |
| Store-Bought Marinara | 5-10 minutes | Medium |
| Creamy Alfredo Variation | 15-20 minutes | Rich |
To get an authentic Italian cuisine feel, aim for a creamy sauce that goes well with the chicken and pasta. Make sure to taste and adjust the seasonings. This will help you create a Chicken Manicotti dish that’s truly unforgettable.
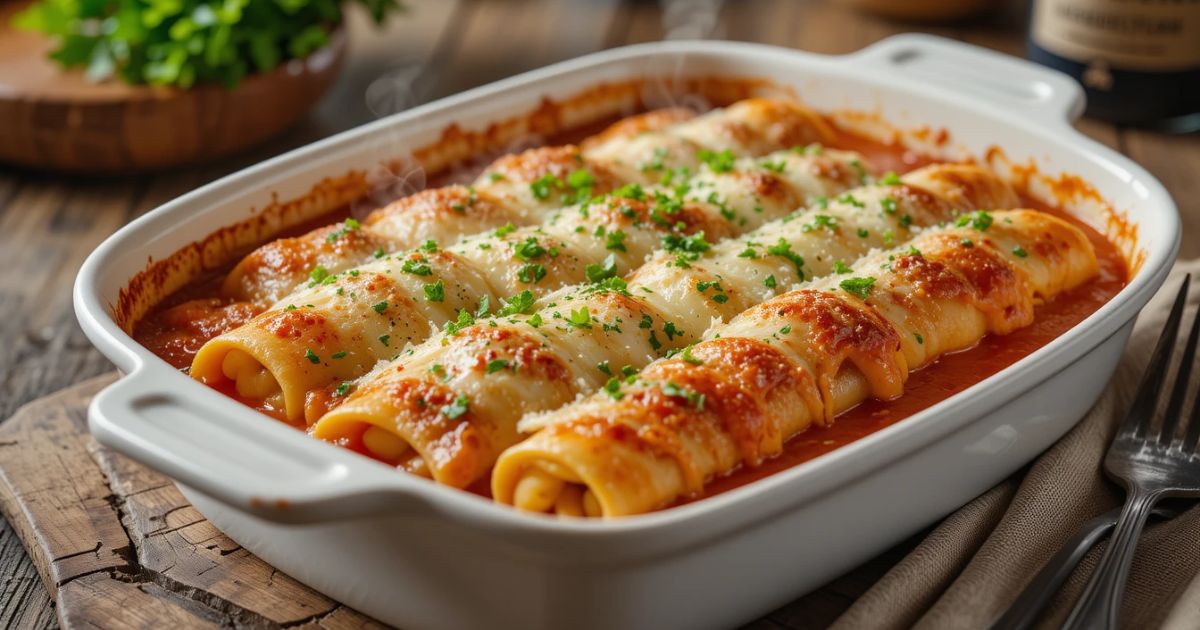
Assembly and Baking Process
Making a tasty dinner like Chicken Manicotti needs careful steps. You’ll turn your ingredients into a meal that everyone will love.
To make this baked pasta dish, layer ingredients carefully and control the oven’s temperature. Here’s how to get it right:
Layering Technique for Maximum Flavor
- Start with a thin layer of marinara sauce at the bottom of your baking dish
- Place the stuffed manicotti shells in a single layer
- Pour more sauce over and between the pasta shells
- Make sure all parts are covered to avoid drying out
Precise Baking Instructions
For a perfect dish, keep the oven at the right temperature and bake for the right time:
- Preheat your oven to 350°F
- Cover the dish with aluminum foil
- Bake for 55 minutes to cook the pasta well
- Remove foil, add more cheese on top
- Bake without foil for 5 minutes to melt the cheese
Pro tip: Check the internal temperature of the manicotti reaches 165°F for perfect doneness.
Your baked pasta dish is now ready to be enjoyed. It’s a comforting and tasty dinner that will surely impress!
Make-Ahead and Storage Options

Preparing a delicious family meal doesn’t have to mean cooking from scratch every time. Chicken manicotti is a versatile comfort food that can be prepared well in advance. It’s perfect for busy households.
When planning to make this dish ahead of time, you have several convenient storage options:
- Refrigerator Storage: Prepare the chicken manicotti up to 2 days before serving
- Freezer Storage: Can be frozen for up to 2 months
- Recommended packaging: Airtight containers or heavy-duty freezer bags
For optimal preservation of flavor and texture, follow these storage guidelines:
| Storage Method | Maximum Duration | Recommended Thawing |
|---|---|---|
| Refrigerator | 2 days | No additional thawing needed |
| Freezer | 2 months | Thaw in refrigerator overnight |
When ready to enjoy, simply reheat the chicken manicotti in a preheated oven at 350°F until warmed through. This approach ensures your family meal remains delicious and convenient, even on the busiest weeknights.
Pro tip: Always cover the dish with foil when reheating to prevent the pasta from drying out.
Conclusion
This chicken manicotti recipe turns a simple dinner into a special treat. Italian food is full of comfort, and this dish is a standout. It’s easy to make and tastes like it came from a restaurant.
Chicken manicotti is great for any time. It’s perfect for family dinners or a quick meal during the week. Try different cheeses or add veggies to make it your own.
Learning to make this dish is just the start. It will help you get better at cooking and try new things. Remember, cooking is fun, creative, and about sharing good times with family.
Make this chicken manicotti recipe a part of your cooking routine. Share your stories and changes with others who love food. Your kitchen will become a place where everyone looks forward to delicious Italian meals.
FAQ
What are manicotti shells?
Manicotti shells are big, tube-shaped pasta noodles. They’re made from semolina flour. You can fill them with cheese, meat, or veggies. In this recipe, they’re stuffed with a creamy chicken and cheese mix, making a tasty Italian dish.
Can I make Chicken Manicotti ahead of time?
Yes! This dish is great for making ahead. You can put together the manicotti and chill it for up to 24 hours. Or freeze it for up to 3 months. Just wrap it tightly with foil to keep it moist.
What can I substitute if I don’t have manicotti shells?
If you can’t find manicotti shells, use large pasta shells or lasagna noodles. You can also try cannelloni tubes. They all work well in this recipe.
Is this recipe gluten-free?
No, traditional manicotti shells have wheat, so they’re not gluten-free. But, you can make it gluten-free by using gluten-free pasta shells or tubes found in specialty stores.
How long does Chicken Manicotti take to prepare?
It takes about 1 hour to make. You’ll spend 30 minutes preparing and 30 minutes baking. It’s a quick dinner for busy families.
Can I use rotisserie chicken for this recipe?
Yes! Using a rotisserie chicken saves time and adds flavor. Just shred the chicken and mix it with the other ingredients for a tasty meal.
How should I store leftover Chicken Manicotti?
Keep leftovers in an airtight container in the fridge for 3-4 days. Reheat by covering with foil and baking at 350°F for 15-20 minutes. This keeps it moist.
Can I make this recipe vegetarian?
Yes! Replace the chicken with ricotta cheese, spinach, or roasted veggies like zucchini and bell peppers. The cheese and marinara sauce will still be flavorful and protein-rich.